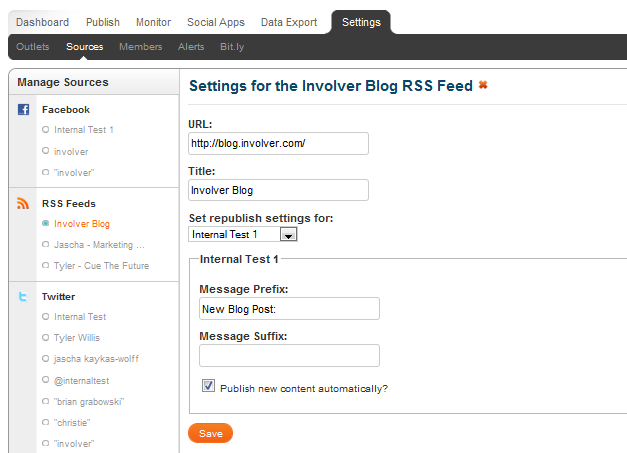
You can automate content publishing by importing RSS content into some or all of your social outlets. Automated republishing allows you to take certain outlets, such as a blog, and promote them automatically to your Twitter or Facebook pages each time there is a new entry.
- Setting up automated publishing. To automate the posting of an RSS feed to your social outlets, click on “Settings” from the main menu, then “Sources”. Enter the Feed URL of the RSS Feed you want to use (be sure to use the full feed address, including “http://” or “feed://”) and its title. Then select an outlet you want to auto-publish to from the “set republish settings” dropdown box. If you’d like to add prefix or suffix text to every message, you can also set that here (also see below). Be sure to select “Publish new content automatically?” See below for an example.
- Adding prefixes or suffixes. Often, people will want to add explanatory text to their automated posts. You can do this by adding a prefix or a suffix to these posts, as suggested above. When editing re-publishing settings for any outlet, you can choose text to automatically publish before or after the post. For example, if I am importing the Involver blog into our Twitter feed, I may want to prefix the tweet with “New Blog Post:” and add a suffix of hash-tagged topics (for example, “#socialmedia #marketing”) so that other Twitter users can find this content easily. To do this, I first select our Twitter account from the drop-down menu, then enter “New Blog Post:” as the prefix and “#socialmedia #marketing” as the suffix, and then turn auto-publishing on.
If you’d like to automatically publish to multiple outlets, select multiple outlets from the dropdown box. Don’t worry – your inputs will be preserved when you click a new item from the dropdown list.
Finally, click “Save” and you’ll get a confirmation message that your source has been updated.
The next time a blog entry is posted, the Twitter account will update and include the prefix, an article summary, bit.ly link, and the tags at the end.

Have questions? Visit our Support Site to browse our Knowledge Base or submit a support request for any unexpected behavior. Our Support Team is happy to help!